


How to make iPhone M4R ringtones on Mac and transfer to your iPhone
- A guide about mediAvatar iPhone Ringtone Maker Mac
mediAvatar iPhone Ringtone Maker Mac helps you make iPhone M4R ringtones from any media files you like and transfer to your iPhone directly. It also built in an iPhone ringtone manager that can insist you upload, download and delete ringtones between iPhone and the Mac computer. And here we divide this guide into the two parts:
- Part 1: Make iPhone ringtones on Mac and transfer to iPhone
- Part 2: iPhone ringtone manager introduction
Tip: You need to connect your iPhone to Mac if you want to directly transfer created ringtones to your phone.
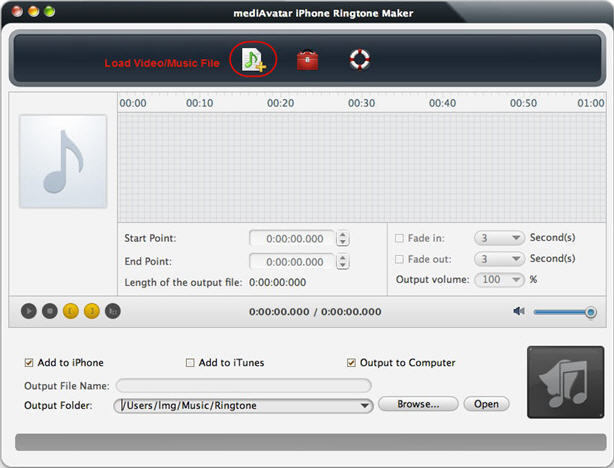
Step 1: Add the file you want to make ringtones from
Click "Add File" button on the toolbar to load the file on you Mac that you want to make ringtones from. iPhone Ringtone Maker Mac supports the most popular video and audio formats incl. AVI, MPEG, WMV, DivX, MP4, H.264/AVC, AVCHD, MKV, RM, MOV, XviD, 3GP, MP3, WMA, WAV, RA, M4A, etc.
Step 2: Customize the ringtone (optional)
mediAvatar iPhone Ringtone Maker Mac allows you to clip the file and make iPhone ringtones from video/audio segment. And you can also add the fade-in/fade-out effect or adjust the output ringtone's volume. If you don't need to do these customizations, go to step 3 to start the conversion.
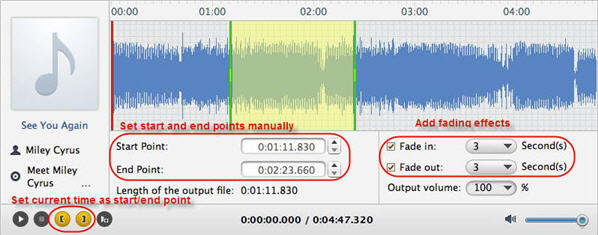
1) Pick out an audio segment from the file as iPhone Ringtone
Click "Play" button and play the loaded file (the red line in the grid area is “current time” line and you can drag the line to any position then start playing). While listening, you can click "Set the current time as start point" or "Set the current time as end point" buttons to get the clip you want. Or drag the green clip start/end line or just enter the start point and end point manually to get the clip.
Click "Play Clip" button to listen to the music you clipped and adjust the segment till it's ringht you want.
2) Add fade-in/fade-out effect
Check the "Fade in" and "Fade out" checkboxes, and set the fade-in and fade-out time according to your need. Click the "play segment" button to play the song with the effect you set.3)Adjust ringtone volume
Select the ringtone volume from the "Output Volume" drop-down list from 20%~200% compared to original volume.
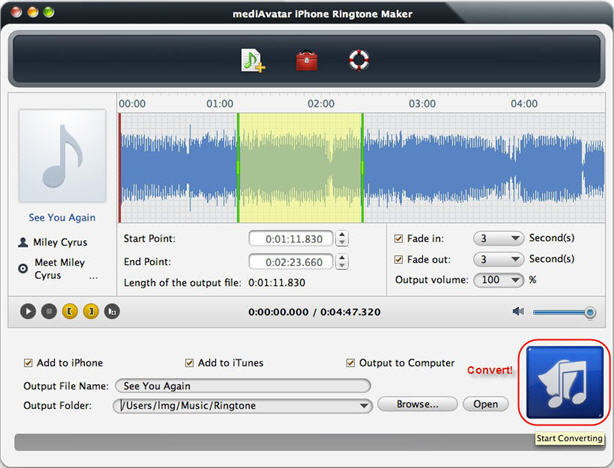
Step 3: Start to convert iPhone ringtone and transfer to iPhone
If you would like to transfer ringtones to iPhone directly after converting, please click you phone to computer. And then check the enabled "Add to iPhone" check box and click the "start converting" button to start the conversion. If you don't want to transfer the ringtones this time, you can use the built-in ringtone manager to upload to iPhone later.

As picture shows above, you can rename the ringtone and change the ringtone store folder on you Mac. After all settings ok, click "Convert" button to start converting!
----------------------------------------------------------------------------------------------------------------------------
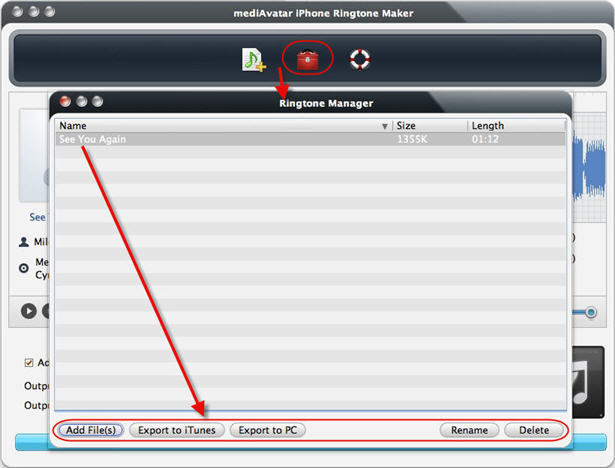
After connecting your iPhone to computer, you can use the ringtone manager to upload, download, delete ringtones or export ringtones to iTunes. Click the "ringtone manager" button on the tool bar to open it. And then just click "Add File(s)" to transfer M4R ringtones from Mac to iPhone, click "Export to iTunes" to backup your iPhone ringtones to iTunes, and "Export to Mac" to transfer ringtones from iPhone to Mac for backup.
Go to the product page to explore more features and have a free trial: Mac iPhone Ringtone Maker