How to create DVD movies from video files with Video to DVD Converter?
- A guide about mediAvatar Video to DVD Converter
No matter what kind of video formats you have, no matter where your videos come from (collected, downloaded or shot by iPhone 4 or camcorders), you can use this mediAvatar Video to DVD Converter to help you convert and burn these videos to DVD movies. And you can also make your own DVD menu, subtitles, soundtracks, watermarks, effects for your DVD movie.
Creating DVD movies of your own is incredibly easy just like 1-2-3:
1. Load videos and insert recordable DVD disc; 2. Create a DVD menu; 3. Start to burn videos to DVD!
To be clear, we divide this guide into two parts:
Part 1: Getting Started
Part 2: Customize DVD Movies
In the Part 1, we will describe the 1-2-3-4 steps to create a DVD movie.
In the Part 2, you can get the detai
ls of how to customize your DVD movies by clipping videos, adding subtitle files and soundtracks, embeding watermarks, and editing video effects.
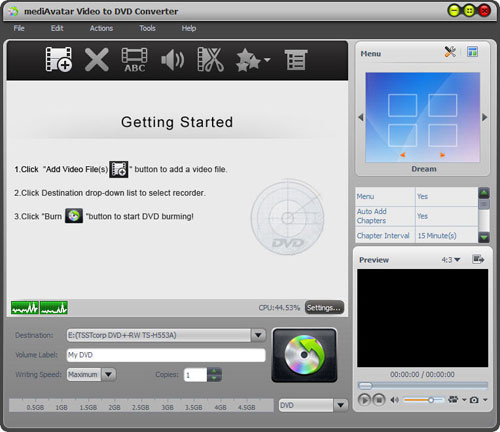
Before start to create DVD movies, please download, install and launch mediAvatar Video to DVD Converter. After launch, you'll see the interface as below. Pretty concise and easy to handle.
Step 1: Load video files
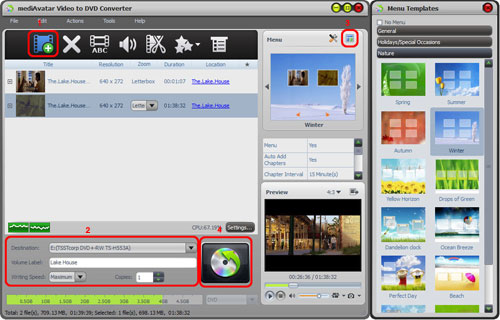
Click "Add Video File(s)" button on the toolbar or click "File > Add Video File(s)…" option from the main menu to load the video files you want to burn.
Or click "File > Add Video Folder…" option from the main menu to choose a folder and load all the supported video files in this folder into the file list.
Step 2: Adjust output settings
Destination: Insert a recordable disc, and choose the disc you insert from the "Destination" drop-down list. Or choose "Save as DVD Folder" or "Save as Image (.iso)" option to burn your video files as DVD folder or ISO and back them up to your hard disk.
DVD Name: Enter a name in the textbox as the DVD name.
Writing Speed: Cchoose an appropriate writing speed from the drop-down list according to your CPU configuration.
Copies: Enter the number or click the up and down arrows to set the number of copies you want to burn. If you set it to more than 1, then the DVD creator will prompt you to insert a new recordable disc after each DVD burning completed.
Step 3: Create DVD menu
Click "Templates" button on the menu panel, then from the "Menu Templates" window that appears, choose your favorite template to create a DVD menu instantly.
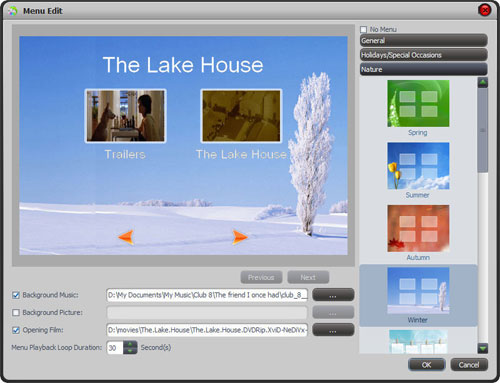
If you want to customize your DVD menu with your own music, picture and opening film, click "Edit" button on the menu panel to open "Menu Edit" window, in which you can change the template, add background music/picture, title and opening film to your menu.
If you don't want any DVD menu, click "No menu".
And if you have DVD menu but you want the DVD play automatically but not display the menu after DVD disc starts, then go to "Tools > Settings > Output" tab, and check "Skip Menu" option.
Step 4: Start creating DVD
Click "Burn" button at the right bottom of the file list to start burning videos to DVD movie.
Tips:
1. If you want to cutomize your DVD movies, go to Part 2.
2. You can preview videos and take snapshot in the player at the right bottom. Select the file in the file list, and click "Play" button in the player to play the file. When the video jumps to the image you like, click "Snapshot" button to store the image in the snapshot folder.
3. By default, this video to DVD converter will add chapters automatically for each DVD movie title at intervals of 15 minutes. If you don't want chapters or want to change the chapter interval, go to "Tools > Settings > Output" tab, and uncheck the "Auto Add Chapters" option or change the time interval.
1. Add subtitle files
Step 1: Choose a video file in the file list, then click "Subtitle" button  on the toolbar to enter the subtitle window.
Click the plus icon on the right panel to choose the subtitle files (up to 32) you want to add in the dialog that opens, then the subtitle files will be displayed in the subtitle list.
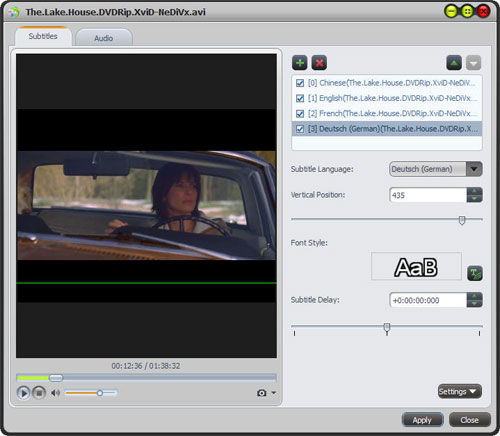
Step 2: Choose a subtitle from the subtitle list, and then choose its respective language from the "Subtitle Language" drop-down list, and optionally adjust their respective vertical position and font style.
If the subtitle is not synchronous with the video, then drag the "Subtitle Delay" slider left or right to adjust the delay time, or just enter the delay time in the textbox, or click the up or down arrow to adjust it higher or lower.
If you want to set default subtitle for your DVD movie while DVD plays, then choose the one you want and click the up arrow on the right top of the subtitle list to move it up to the first place in the list.
Step 3: After adding and editing subtitle files, click "Apply" and "OK" to return to the main interface.
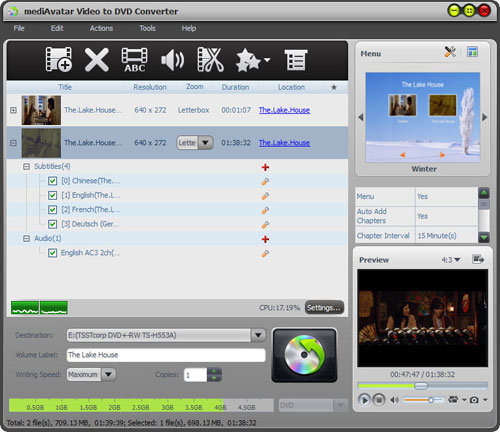
Click the plus icon at the front of the video to expand its subtitle items, you will find the subtitles you added are listed below the video.
To add more subtitles to your DVD movie, click the plus icon in the subtitle row. And click the pen icon to edit certain subtitle.
2. Add soundtracks
Step 1: Choose a video file in the file list, then click "Audio" button  on the toolbar to enter the audio window.
Click the plus icon on the right panel to choose the audio files you want to add as DVD soundtracks (up to 8 audio files) in the dialog that opens, then the audio file is displayed in the soundtracks list.
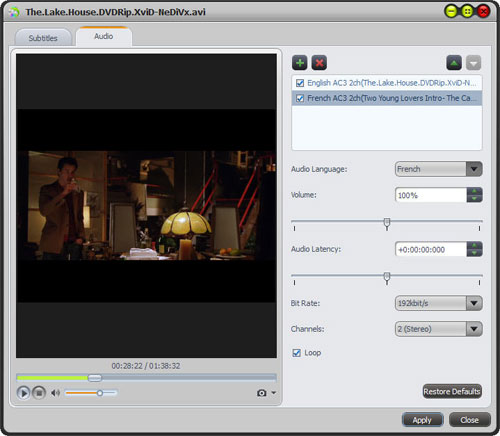
Step 2: Choose a soundtrack from the soundtrack list, and then choose its language from the "Audio Language" drop-down list, and adjust its volume, bit rate, and channels according to your own need.
If the soundtrack is not synchronous with the video, then drag the "Audio Latency" slider left or right to set the latency time, or enter the latency time in the textbox, or click the up or down arrow to adjust it higher or lower.
If you want to set one of the soundtrack as the default one when DVD plays, then select it then click the up arrow on the right top of the audio track list to move it up to the first place in the list.
Step 3: After adding and editing soundtracks, click "Apply" and "OK" to return to the main interface.
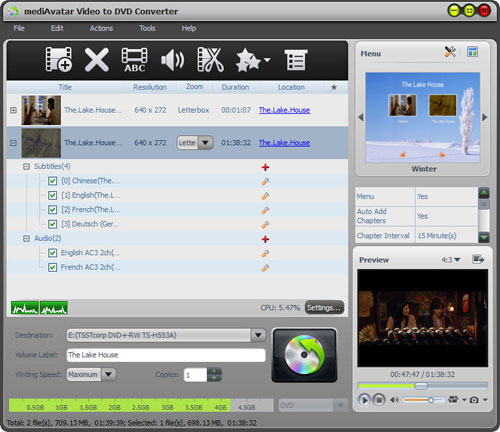
Click the plus icon at the front of the video to expand its soundtrack items, you will find the soundtracks you added are listed below the video.
To add more soundtracks, click the plus icon on the soundtrack row. And click the pen icon to edit soundtracks.
3. Clip video file
Step 1: Select a video from the file list, then click "Clip" button  on the toolbar to enter "Clip" window as below.
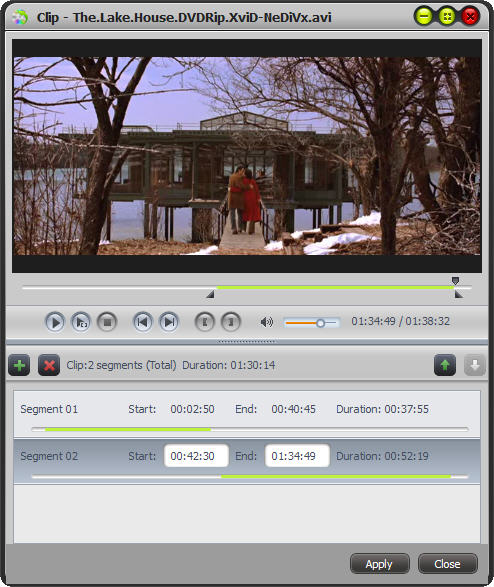
Step 2: Click "Play" button to play the video, when it comes to the start point you want, click "Set Start Point" button to set this point as the start time, then set the end time in the same way. You will see a new segment is added into the segment list below.
Step 3: Click "New Clip" button at the left top of the segment list, and repeat the Step 2 to set the start and end time of this segment. Repeat this step to extract as many segments as you want.
Step 4: Click "Apply" button to apply the settings and click "Close" button to return to the main interface. All the segments you extracted will be merged, and the original video will be replaced by this newly merge one.
4. Add effects, crop video size, add watermarks
Choose a video in the file list, and click the "Effect" button  to enter "Effect" window.
Add effects
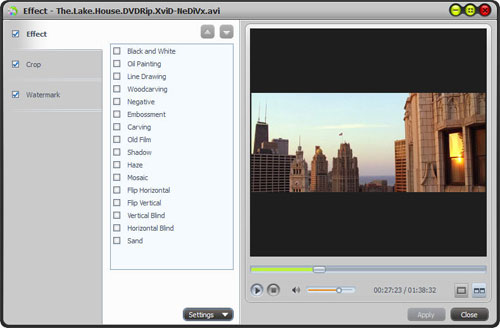
Go to the "Effect" tab, check the effects you want. Click the up and down arrows to adjust the order of the effects you checked.
Crop video size
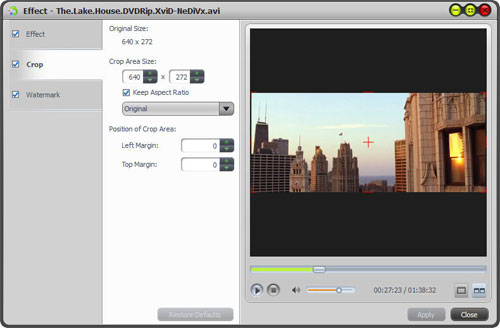
Go to the "Crop" tab, enter the height and width below the "Crop Area Size" label, and enter the left and right margin below the "Position of Crop Area" label to set the crop area. Or drag the horizontal and vertical lines on the preview window to set the crop area. And according to your own need, check "Keep Aspect Ratio" option and choose the aspect ratio you want from the drop-down list.
Add watermarks
Go to the "Watermark" tab, click "Add Text Watermark" button, and input the content of text watermark in the list, and adjust the settings below.
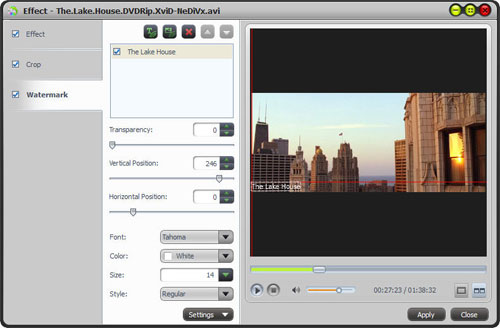
To add picture watermark, please click "Add Picture Watermark" button, and choose a picture in the dialog that opens, and adjust the settings below.
Tip: After adding effects, cropping area size and adding watermarks, click "Comparing Preview" button to preview the original and fixed ones in the two windows for comparison to check the final effects more clearly.
Want to have a trial now? Go to this mediAvatar Video to DVD Converter for free download to find more.


